Mircoscopes
Many of the devices around us perform useful tasks by manipulating light, charge, or both. The techniques of optics deal with light and allow cameras to record images of the objects in front of them, our eyes to observe those objects directly, and eyeglasses and magnifying glasses to help us see details we'd miss with our eyes alone. The techniques of electronics deal with charge and permit an audio player's memory to store sound information, its computer to retrieve that information, and its amplifier and headphones to re-create the sound at the push of a button.
Optical tools such as lenses and prisms have been around for hundreds of years, and electronic devices such as resistors, capacitors, and inductors also have a long history. Advances of modern technology, however, have accelerated developments in both fields. The invention of lasers has sped the growth of the optics industry and the invention of transistors has revolutionized the world of electronics. Rapid progress in both fields, optics and electronics, has brought them closer together and has given birth to the combined field of optoelectronics. There is even hope that one day computers will be as much optical devices as they are electronic.
Cameras
In the two centuries since their invention, cameras have become extremely easy to use. What started as a hobby for a few dedicated enthusiasts has evolved into an everyday activity. Despite all the technological improvements, however, photography still employs many of the same principles it did in the 1800s. Cameras still use lenses to project images onto light-sensitive surfaces, and photographers still have to worry about getting the exposure right, focusing properly, and avoiding the blur of rapid motion.
Lenses and Real Images
When you take a picture of the scene in front of you, the lens of your camera bends light from that scene into a real image on a light-sensitive surface. A real image is a pattern of light, projected in space or on a surface, that exactly reproduces the pattern of light in the original scene. Since the real image that's projected looks just like the scene you're photographing, recording the light in that image is equivalent to recording the appearance of the scene itself.
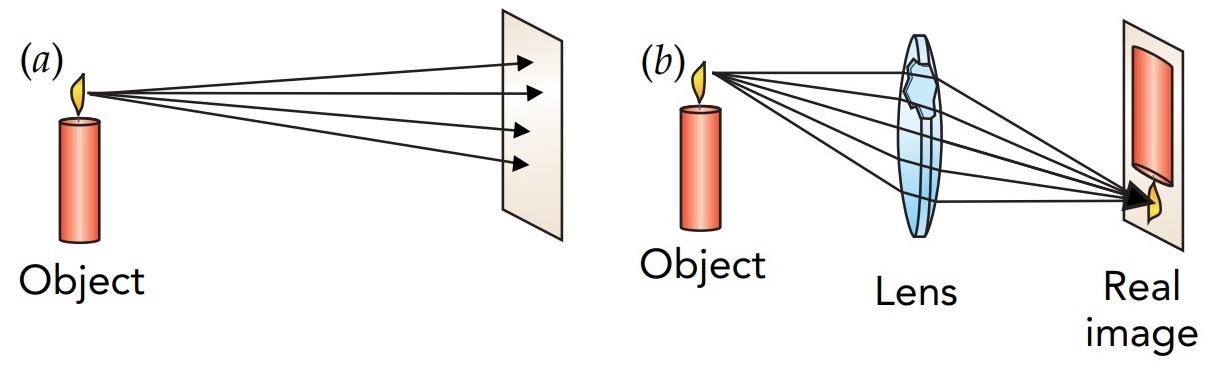
That light-sensitive surface was at one time always photographic film, but now digital cameras have almost completely replaced film with electronic image sensors. Fortunately, the two light-sensing surfaces are essentially interchangeable, so we can refer to them both as image sensors: one is electronic, and one is photochemical. Real images don't occur without help. When light from a candle falls directly on an image sensor, it produces only diffuse illumination. Similarly, you can't tell by looking at a sheet of paper what a candle looks like because the light that leaves the candle travels in all directions and is as likely to hit the top of the paper as it is to hit the bottom.
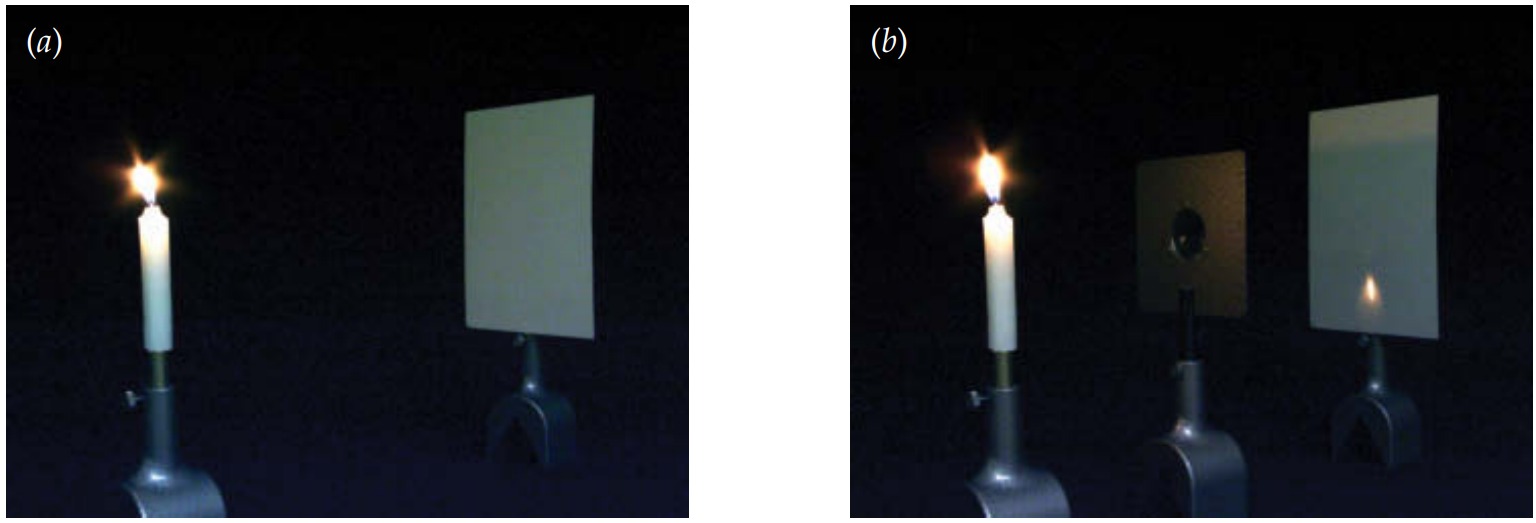
That's why a camera needs a lens, a transparent object that uses refraction to form images. The light passing through a lens bends twice, once as it enters the glass or plastic and again as it leaves. In a camera lens, this bending process brings much of the light from one point on the candle back together at one point on the sensor. The real image that forms is upside down and backward. This inversion of the real image relative to the object always happens when a single lens creates a real image.
The curved shape of the camera lens allows it to form a real image. Light passing through the upper half of the lens is bent downward, while light passing through the lower half is bent upward. Because the camera lens bends light rays toward one another, it's a converging lens. You can see how it forms an image by following some of the rays of light leaving one point on the candle.
The upper ray from the candle flame travels horizontally toward the top of the lens. As it enters the lens and slows down, this ray of light bends downward. It bends downward again as it leaves the lens and travels downward toward the bottom of the image sensor. The lower ray from the candle flame travels downward toward the bottom of the lens and bends upward as it enters the lens. It bends upward again as it leaves the lens and travels horizontally toward the bottom of the image sensor. These two rays of light reach the image sensor at the same point. They are joined there by many other rays from the same part of the candle flame so that a bright spot forms on the sensor. Overall, each part of the candle illuminates a particular spot on the image sensor, so the lens creates a complete image of the candle on the sensor
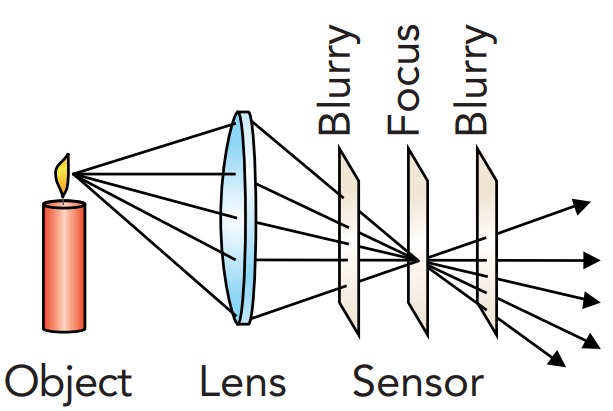
However, the lens can bring the light back together to form a sharp image on the sensor only if the lens and sensor are separated by just the right distance. If the sensor is too close to the lens, then the light doesn't have room to come together. If the sensor is too far from the lens, then the light begins to come apart again before reaching the sensor. In either case, the image on the sensor is blurry. The candle's real image is only in focus at one distance from the lens.
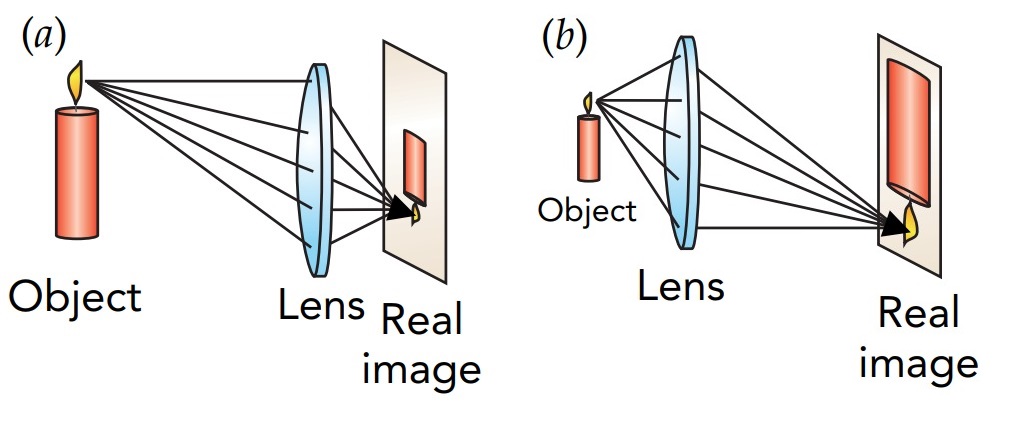
If the candle moves toward or away from the camera lens, the distance between the lens and the image sensor must also change. When the candle is far away, all its light rays that pass through the lens arrive traveling almost parallel to one another and the inward bend caused by the lens makes those rays converge together quickly. The rays come into focus relatively near the lens, and that's where the sensor must be. The candle's image on the sensor is much smaller than the candle itself because the light rays have only a short distance over which to move up or down after leaving the lens. When the candle is nearby, its light rays that pass through the lens are diverging rapidly and the inward bend caused by the lens is just barely enough to make those rays converge at all. As a result, the rays come into focus relatively far from the lens. The candle's image on the sensor is quite large because the light rays have considerable distance over which to move up or down after leaving the lens.
Because distant and nearby objects form real images at different distances from the camera lens, they can't both be in focus on the same image sensor. When you take a picture of a person standing in front of a mountain, only one of them can be in sharp focus. However, if you're willing to compromise a little bit on sharpness, a lens can sometimes form acceptable images of both objects.
Focusing and Lens Diameter
A disposable camera is little more than a box with a lens. The lens projects a real image of the scene in front of it onto the camera's image sensor. Light in the real image exposes the image sensor, which records the image permanently. While it may also have a shutter that starts and stops the exposure, a flash to provide extra light, and a mechanism that prepares for the next photograph, there's little else to this simple camera.
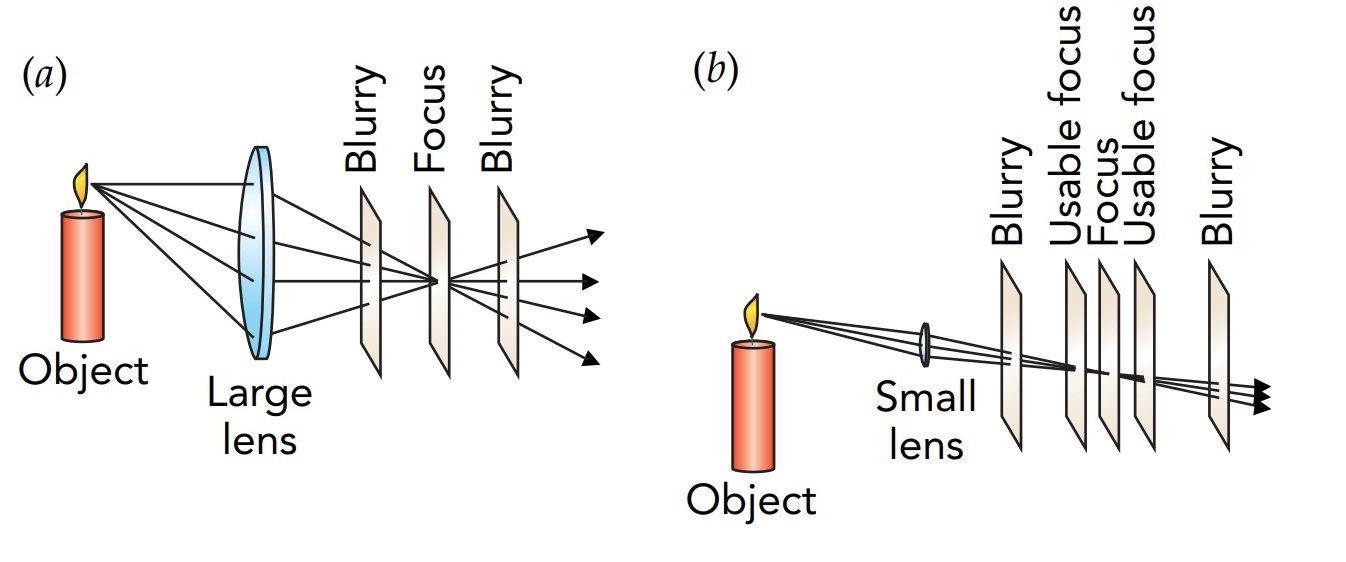
However, there are limitations to the disposable camera design. One of the most severe limitations is that you can't focus it-the camera has a fixed distance between the lens and image sensor. Nonetheless, it manages to form relatively sharp real images on the sensor, even when there are objects at various distances from the camera. These simple cameras work because they use narrow (small-diameter) lenses. A narrow lens gathers less light than a wide lens, but it doesn't require focusing, adjusting the distance between the lens and the image sensor. Because a wide (large-diameter) lens brings rays together from many different directions, you must focus it; if the image sensor is even slightly too near or too far from the lens, the recorded image will be blurry. In contrast, a narrow lens forms a reasonably clear image even without focusing. Any rays from one part of the scene that succeed in passing through the narrow lens must already be fairly close together. Their initial closeness means that these converging rays illuminate only a small part of the image sensor even when the sensor isn't exactly the right distance from the lens.
Since the image sensor can't record every minute detail anyway, the image that forms on it doesn't have to be in absolutely perfect focus. As a result, a camera with a narrow lens and no focus adjustment manages to take pretty good pictures.
Unfortunately, these simple cameras collect very little light and need extremely lightsensitive image sensors. These high-speed sensors can't record photographs that are as sharp as low-speed sensors can. Furthermore, the pictures produced by simple cameras lack fine details; although everything is almost in focus, most things are a bit fuzzy if you look carefully or make enlargements.
More sophisticated cameras use wider lenses that gather more light and expose the image sensors much more rapidly. They also automatically adjust the distance between the lens and the sensor. They identify the object you are photographing and position the camera lens so that it projects a sharp image on the sensor. As the camera focuses, you can usually see components in the lens moving backward or forward to arrive at the correct distance from the sensor. Even a camera with a wide lens can take advantage of the narrow lens trick for focusing. Its lens contains an internal diaphragm that reduces its aperture, or effective diameter. The diaphragm is a ring of metal strips with a central opening. These strips can swing in or out, changing the diameter of the diaphragm's opening and with it the aperture of the lens.
When its lens aperture is narrow, the sophisticated camera imitates a simple camera- nearly everything is essentially in focus simultaneously. In such a situation, the camera has a large depth of focus. Actually, the sophisticated camera can bring the most important object into perfect focus, so it produces pictures that are superior to those from simple cameras. However, narrowing the aperture of the lens also reduces the amount of light reaching the image sensor. The scene in front of the camera must either be very bright or the exposure must be relatively long. You don't get something for nothing.
Although widening the aperture of a large lens makes full use of its light-gathering capacity, focusing then becomes crucial. Even a small error in the lens-to-sensor distance produces a blurry picture, so the depth of focus is very small. This trade-off between light gathering and depth of focus is a continual struggle for photographers. However, photographers sometimes take advantage of the small depth of focus in wide lenses to blur the background or foreground of a photograph deliberately. A camera's portrait setting adopts this strategy to produce sharp images of people against blurred backgrounds.
At other times, photographers choose long exposures at narrow apertures to bring an entire scene into sharp focus. A camera's landscape setting takes this route, so everything in the photograph shows full detail. To capture fast motion while retaining a large depth of focus, photographers use a flash to brighten the scene and shorten the exposure. Unfortunately, a camera flash is ineffective at brightening a distant scene, and it can produce unpleasant reflections from windows and eyes. A camera's sports setting emphasizes brief exposures to avoid speed blur, even though that may require a wide aperture and small depth of focus.
Focal Lengths and f-Numbers
Lenses are characterized by two quantities: focal length and f-number. The focal length of a lens is the distance between the lens and the real image it forms of a very distant object. For example, if a real image of the moon forms 100 mm behind a particular lens, then that lens has a focal length of 100 mm. The focal lengths of camera lenses range from less than 10 mm in many cell phones and compact cameras to about 2 m in cameras used for nature photography. When light from a scene passes through a short-focal-length lens, it comes to a focus near that lens and produces a relatively small image on the image sensor. Because a long-focal-length lens permits the light passing through it to spread out more before coming to a focus, it produces a larger real image on the sensor.
The “normal” lens for a particular camera has a focal length that allows all the objects in your central field of vision to fit onto the image sensor (see Table). When you hold the finished photograph about 30 cm from your eyes, the objects in the picture appear about the same size they did when the photograph was taken. The focal length of a camera's normal lens is about 1.5 times the horizontal width of its image sensor.
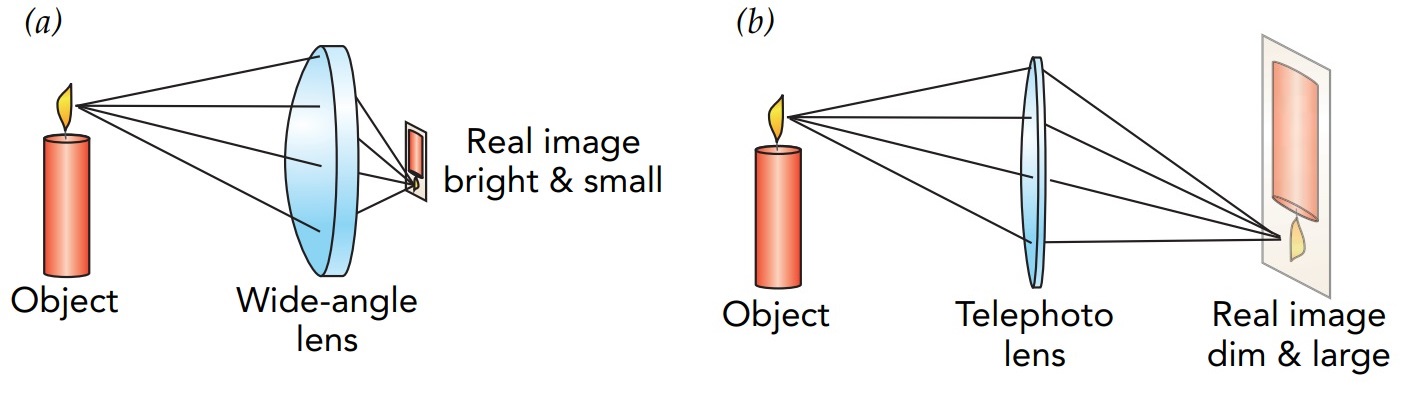
A wide-angle lens has a shorter focal length than the normal lens. The image it projects onto the image sensor is smaller but brighter, and most of the objects in your entire field of vision appear in the photograph. A telephoto lens has a longer focal length than the normal lens. The image it projects onto the sensor is larger but dimmer, with only objects at the center of the scene appearing in the photograph.
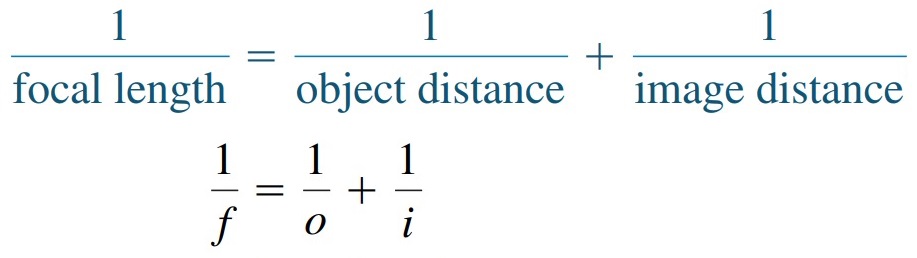
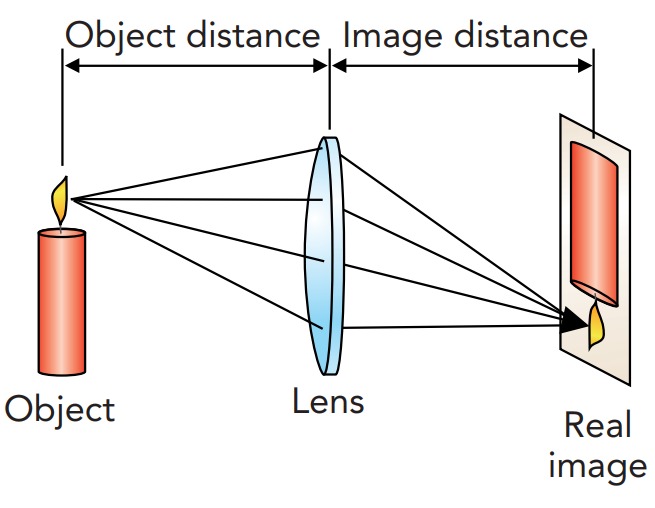
In addition to indicating where the image of a distant object forms, the focal length of the camera lens relates the object distance to the image distance. The object distance is the distance between the lens and the object you're photographing. The image distance is the distance between the lens and the real image it forms. The relationship is called the lens equation. That is, One divided by the focal length of a lens is equal to the sum of one divided by the object distance and one divided by the image distance. . It implies that the farther away an object is, the closer to the lens its image forms.
Several Cameras, the Widths of the Image Sensor They Use, and Their Normal Lenses
| Type of Camera | Sensor Width | Normal Lens |
|---|---|---|
| Typical digital camera | 8 mm | 12 mm |
| 35-mm camera | 36 mm | 50 mm |
| 2¼-inch medium-format camera | 2¼ inches | 80 mm |
| 5-inch portrait camera | 5 inches | 180 mm |
According to the lens equation, the image distance for a distant object is equal to the focal length of the lens. That agrees with our earlier discussion of focal length. However, when the object is nearby, the image distance becomes larger than the focal length. That's why a camera lens moves away from the image sensor as you focus closer. When the object distance becomes less than the focal length, the image distance becomes negative and no real image forms at all. That's why you can't focus on an object that's too close to the lens. A lens's f-number characterizes the brightness of the real image that it forms on the image sensor, with smaller f-numbers indicating brighter images. The f-number is calculated by dividing the lens's focal length by its diameter.
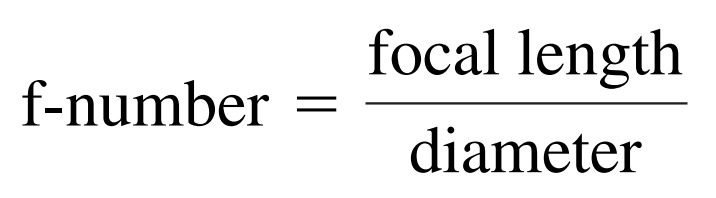
Since long focal length lenses naturally produce larger and dimmer images on the image sensor, the f-number takes into account both the light-gathering capacity of the lens and its focal length. Increasing a lens's diameter increases its light-gathering capacity and decreases its f-number. Increasing a lens's focal length decreases the brightness of its real image and increases the f-number. Doing both at once, increasing the lens diameter and focal length equally, leaves the brightness and f-number unchanged.
Most sophisticated cameras use large-diameter lenses so that their f-numbers are generally less than 4. Since it's difficult to fabricate a lens that's larger in diameter than its focal length, the smallest practical f-number is about 1. Also, because long-focal-length lenses need large apertures to keep their f-numbers small, some telephoto lenses are huge. The diaphragm inside a lens allows you to decrease the lens's aperture and thus increase its f-number. A factor of 2 increase in f-number corresponds to a factor of 2 decrease in the lens's effective diameter and a factor of 4 decrease in the lens's lightgathering area. Thus when you double the f-number of the lens, you must compensate by quadrupling the exposure time. Although closing the aperture increases the lens's depth of focus, it requires a longer exposure.
Improving the Quality of a Camera Lens
A high-quality camera lens isn't a single piece of glass or plastic. Instead, it's composed of many separate elements that function together as a single lens. This complexity improves the quality of the real image. To begin with, dispersion in a single-element lens causes different colors of light to bend differently and focus at different distances behind that lens. Known as chromatic aberration, this problem can be fixed by using several lens elements made of different types of glass or plastic with different amounts of dispersion. These elements compensate for one another so that the overall lens, known as an achromat, has very little dispersion and almost no color-focusing problems.
After correcting for color and other technical image problems, a sophisticated camera lens may contain more than 10 individual elements. For the purposes of the lens equation, this complicated lens has an effective center from which to calculate object and image distances. However, having so many separate elements creates reflection problems; each time light passes from air to glass or vice versa, some of it reflects. To avoid fogging the photographs with this bouncing stray light, the individual elements are antireflection coated with thin layers of transparent materials. The best coatings use interference effects to cancel out the reflected light waves and give the lens only a weak violet reflection.
Many modern cameras are equipped with zoom lenses. A zoom lens is a complicated lens that can change the size of the real image it projects onto the image sensor. By carefully moving its lens elements relative to one another, the zoom lens can adjust its effective focal length.
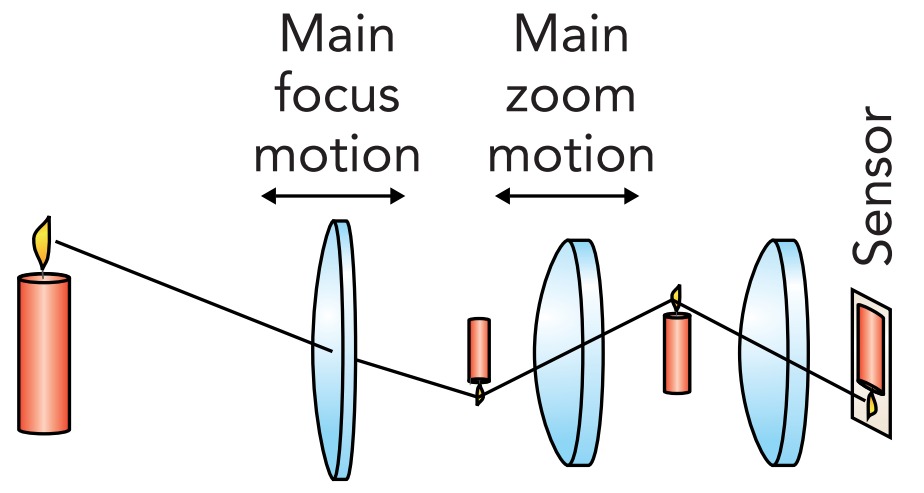
A common type of zoom lens contains three separate groups of lens elements and produces a sequence of three images. The first lens group forms a first image of the scene in front of the camera. The second lens group forms a second image of that first image. The third lens group projects a third, real image of the second image onto the image sensor. Zooming the lens-that is, changing its focal length-involves altering the spacings between the lens groups to vary the second lens group's object and image distances and thus the relative sizes of the first and second images.
As the zoom lens changes from short focal length to long focal length, the image it projects on the sensor becomes larger. This effect allows you to compose the picture so that the scene fills the photograph completely. A lens that can change its focal length while retaining the same f-number and still keep the real image in focus on the sensor is a truly remarkable achievement.
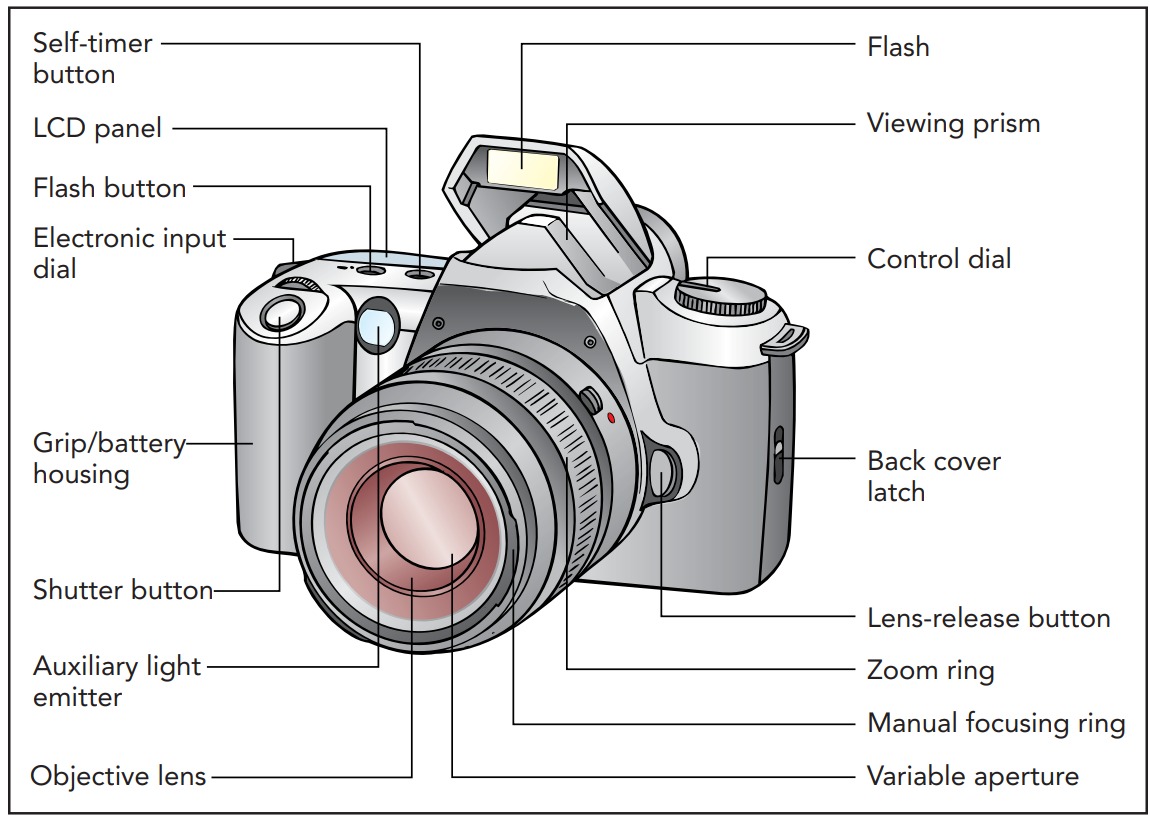
The Viewfinder and Virtual Images
SLR or single lens reflex cameras permit you to change their lenses so that you can choose a lens that's optimized for the task at hand. When you peer through the viewfinder of an SLR camera, you're looking at the same real image that will be projected onto the image sensor during the exposure. The light you see travels through the camera's main lens, reflects off a mirror, and projects onto a translucent screen inside the top of the camera. You're simply inspecting this screen and the real image through a magnifying lens in the eyepiece. During the exposure, the mirror flips out of the way and the real image projects briefly onto the image sensor.
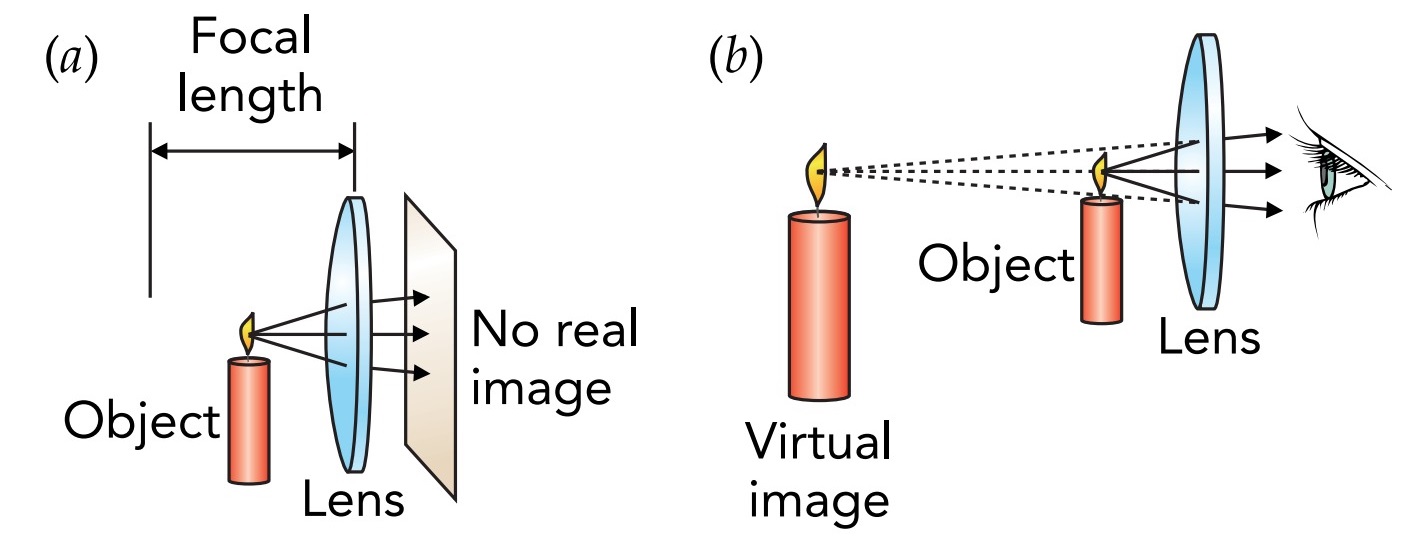
Since the screen and real image are only an inch or two from your eye, you can't focus on them without the help of the eyepiece lens. The eyepiece lens is converging, but in this case it doesn't form a real image. Instead, it forms a virtual image, an image located at a negative image distance-that is, on the wrong side of the lens! The screen displaying the scene that you're photographing is so close to the eyepiece lens that the object distance is less than that lens's focal length. According to the lens equation, the image distance should be negative, and it is; the image is located on the screen side of the eyepiece lens. You can't put your fingers in the light and project this image on your skin because the image is virtual rather than real.
You can, however, see this image through the eyepiece. It's located farther away than the screen itself, so your eye can comfortably focus on it. Also, the image is magnified- the eyepiece lens is acting as a magnifying glass. This lens provides magnification because, when you look at the screen through it, the screen image covers a wider portion of your field of vision. This magnification increases as the eyepiece lens's focal length decreases. That's because a shorter-focal-length eyepiece lens must be quite close to the screen, where it can bend light rays coming from a smaller region so that they fill your field of vision. The eyepiece lens in a typical camera has been chosen so that the screen fills a comfortable portion of your visual field, allowing you to examine the virtual image in great detail and adjust the lens and camera settings until you have just the right picture in your view. Then all you have to do is take the photograph.
Cameras with fixed lenses often have two separate viewfinder systems. A typical digital camera has an electronic viewfinder, which displays the real image being projected onto its image sensor. Many digital and most film cameras also have optical viewfinders.
Although optical viewfinders vary in style and sophistication, the best combine real and virtual images. In a real-image optical viewfinder, a system of lenses, mirrors, and or prisms produces an erect real image of the scene and you then examine that real image through an eyepiece magnifying glass. The lenses projecting the real image zoom along with the camera's main lens so that what you see through the viewfinder is similar to what the camera's image sensor will record.
Image Sensors
Once the lens has projected its real image onto the image sensor, it's the image sensor's job to record that pattern of light. Interestingly enough, both film and electronic image sensors use semiconductors, and both detect light when its photons shift electrons from valence levels to conduction levels. However, how those two image sensors act on the electron transitions is quite different.
Photographic film detects light photochemically. Embedded in the film are tiny crystals of silver salts. Composed primarily of silver and halogen atoms, these semiconductor crystals are extremely sensitive to light. When a silver halide crystal absorbs a photon of visible light, it can undergo a radiative transition that shifts an electron from a valence level to a conduction level and eventually frees one silver atom from a silver halide molecule. After several nearby silver atoms have been freed by light, they can form a tiny particle of silver metal. When the film is developed, this silver particle transforms the entire silver halide crystal into metallic silver. The microscopically rough structure of that silver makes it appear black rather than shiny.
In black-and-white photography, the silver particles themselves form a negative image on the developed film. Wherever the film was struck by light, it acquires a dense, black pattern of silver particles. Wherever light was absent, the film becomes clear once the unexposed silver salts are washed away. Although the image on the developed film itself is negative-light is dark and dark is light-the process of preparing photographic prints reverses light and dark a second time so that the image on the prints is positive. In color photography, the silver halide crystals are exposed to light through color filters and sensitizers, so that the film separately records its exposure to the three primary colors of light. During development, the silver itself is washed away, but a negative color image remains in the film. For example, wherever blue light struck the film, it acquires a yellow tint and therefore absorbs blue light. Again, the photographic printing process reverses the colors a second time so that the prints have positive images.
Electronic image sensors are based on photodiodes, diodes that are optimized to detect light. They combine the light-sensing behavior of photoconductors with the current-controlling behavior of diodes. A vast array of these photodiodes record the pattern of light in the real image, and the camera subsequently reads that pattern by measuring the accumulated charges on each of its photodiodes. To obtain color information, the image sensor's photodiodes are covered with a pattern of red, green, and blue filters so that each photodiode measures the intensity of only one primary color of light.
Eyes and Eyeglasses
Not all cameras involve modern technology. Most people are born with two of them-their eyes. Like the cameras we have discussed, each eye consists primarily of a converging lens and an image sensor. In this case, the lens is a combination of the front surface of the eyeball, its cornea, and the internal lens just beneath the cornea. The image sensor is the retina, a vast pattern of light-sensitive cells and nerves at the back of the eyeball.
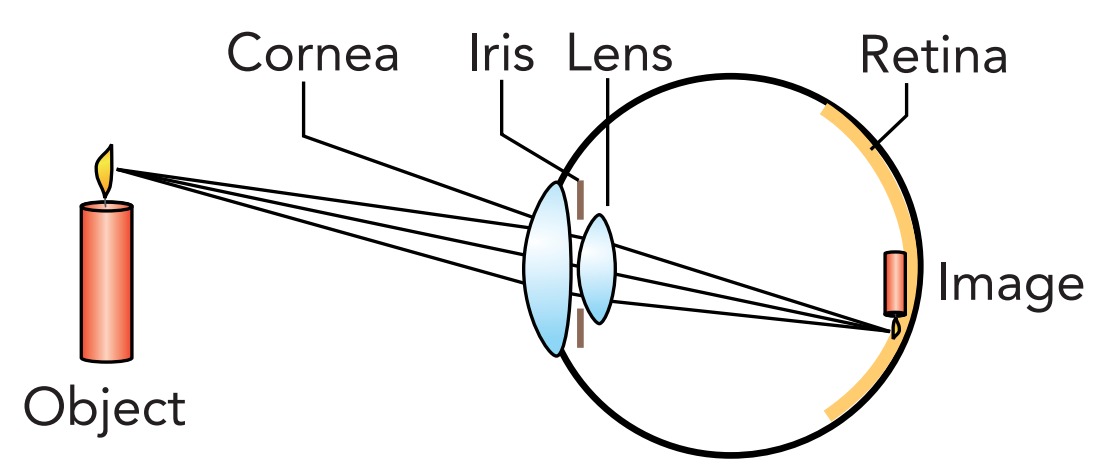
When you look at the scene in front of you, the cornea and lens of your eye project a real image of that scene onto your retina and your retina reports the resulting pattern of light to your brain. As usual, the real image is inverted and reversed left to right, but your brain compensates for that effect.
Since your eyeball can't alter the distance between the lens and the image sensor, it focuses the real image by adjusting the focal length of the lens. When you look at nearer objects, the lens in your eye becomes more highly curved and its focal length decreases. The light rays from that nearer object thus converge more sharply and form a real image on your retina. When you view a more distant object, the lens becomes less curved and its focal length increases.
Like a sophisticated camera, your eye has an iris within its lens system. When you view a bright scene, that iris shrinks to limit the amount of light striking your retina. As a side effect, your depth of focus increases and everything appears sharper. It's easier to focus when you read or work in a welllighted environment. However, not all eyes are perfect, and many need help forming sharp real images on their retina. Although modern laser surgical techniques can reshape corneas to improve image sharpness, the classic approach to better vision is to wear eyeglasses or contact lenses. An eye's lens system already consists of two components, the cornea and the lens, so adding a third component, eyeglasses, is no big deal. A person who is farsighted can't see nearby objects sharply because her lens system has too long a focal length. Although it can project real images of distant objects on her retina, nearby objects focus too far away from the front of her eye and the light strikes her retina before it forms a real image.
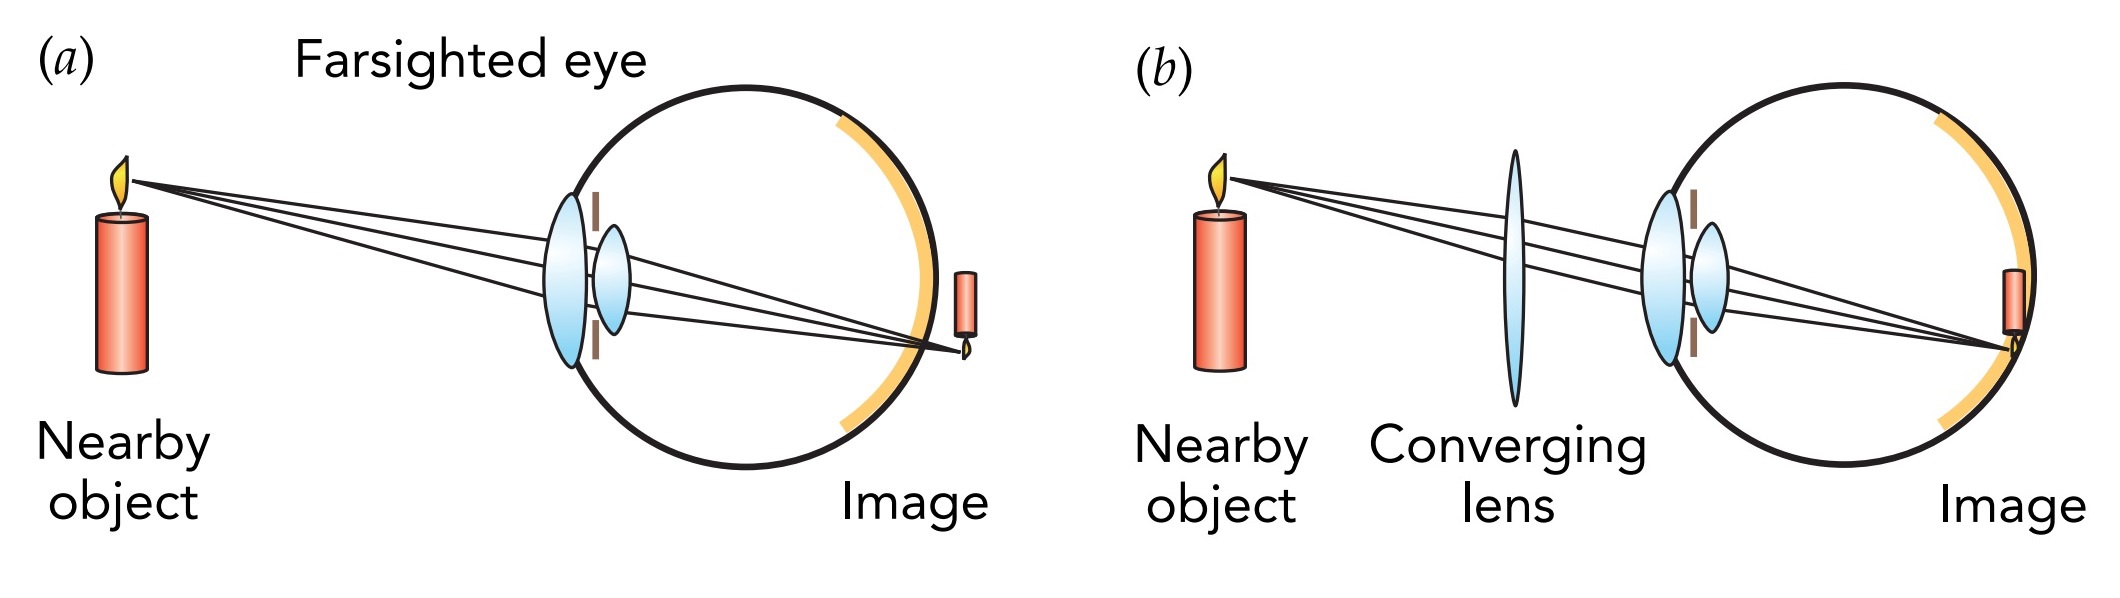
To compensate for farsightedness, she wears eyeglasses with converging lenses. These lenses begin the task of bending light rays together even before they enter her eyes. Her own lens system completes the bending, and the real images form closer to the front of her eyes. She is thus able to see nearby objects clearly. In contrast, a person who is nearsighted is unable to focus on distant objects because his lens system has too short a focal length. The real images of those distant objects form too close to the front of his eye, and the light has already begun to spread apart by the time it reaches his retina.
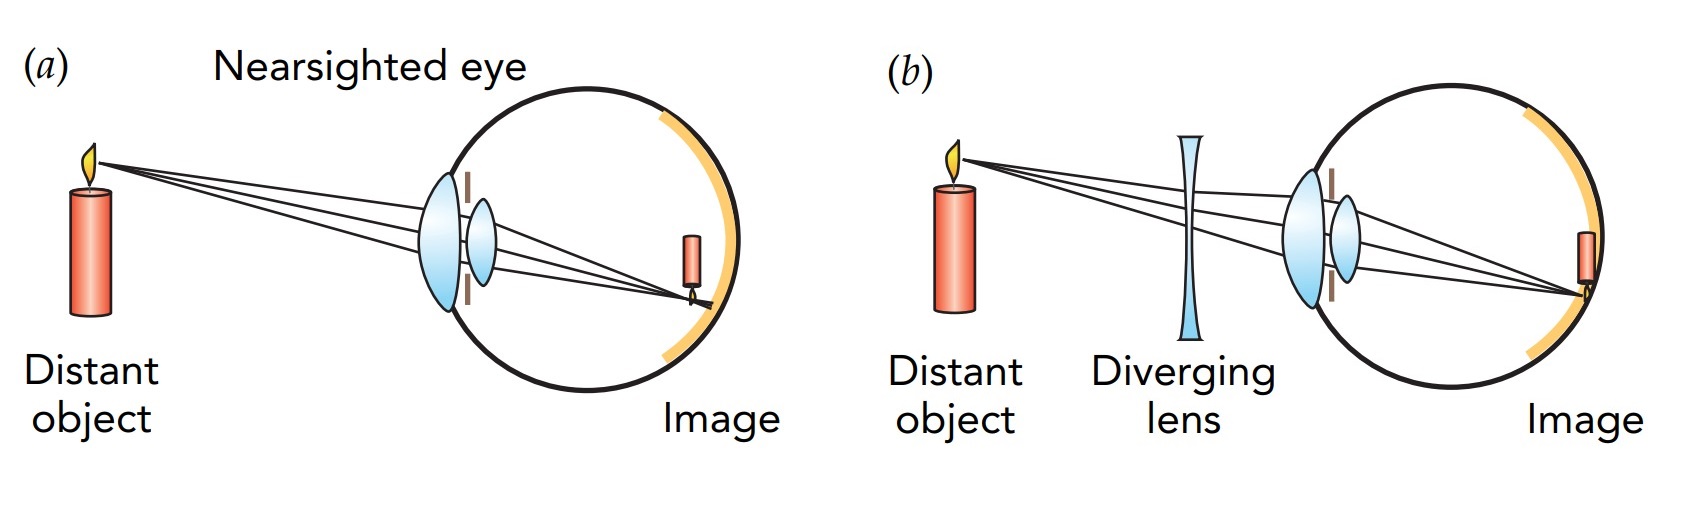
To compensate for nearsightedness, he wears eyeglasses with diverging lenses. A diverging lens is one that bends light rays apart and therefore has a negative focal length. Typically thinner at its middle than at its edge, a diverging lens bends the nearly parallel rays of light from a distant object so that they diverge more rapidly. Those rays then appear to come from a much nearer object, actually a nearby virtual image, and his eyes are able to focus them properly on his retina.